
Welcome, Very Good Morning / Afternoon / Evening friends - welcome to learn #MSBI step by step with Gurunatha S.Dogi. Actually I wanted to start dimensions and measures with an example of slowly changing dimension component but suddenly changed my mind and thought before jumping into that let me just show you how to do insert and update data table using merge join then same load and update data table can be seen using slowly chagining dimension component.
Who we are and What we do : . We are #Questpond an e-learning firm founded by Mr.ShivPrasad Koirala in 2004 with a vision of spreading IT knowledge. If you are seeking to enter into IT world then come to us for professional learning environment. We just not only provide training but videos which are not just theory and talks , its Step by Step demonstration with actual code and fundamentals. If you want to know more visit Questpond website.
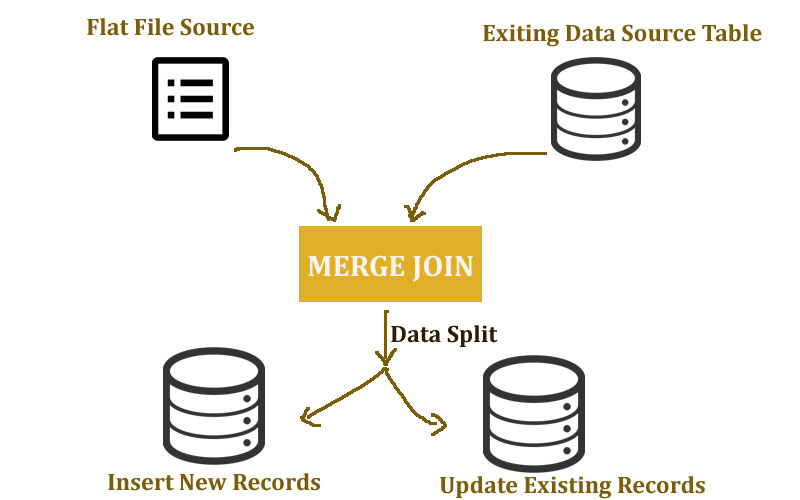
In this article session we will learn how to do load and update data in data table using merge join component in SSIS step by step.
Merge Join : Merge Join tranforms two sorted dataset using INNER, FULL and LEFT join into single output. It generates single output from two sorted dataset.
If you are new #MSBI request you read our previous written articles or watch our #MSBI videos.
Let's first understand why we are doing this example normally what happens if any updates come back on stored data in data warehouse with some additional changes it becomes difficult on production server to delete all records and load back if it small number of records then its fine but if it is lacks of data then it is not professional approach to delete and re-insert all rather than we will update necessary changes and if new data is there we will insert that to. So in simple words we will not delete all records but we will update existing records and insert new records.
Here in this example we will do same thing that is we will load both dataset (Source file and Datasource) and we will check if there is existing data matches if yes then we will update our records or if not then we will consider it as a new data and same we will insert into same data table.
Let's do this an example step by step.
Step 1
Open up Microsoft business Intelligence -> create a new SSIS project i.e. Integration Service Project -> On control flow tab drag and drop Data Flow Task. All these steps are very similar what we in our third article.
Step 2
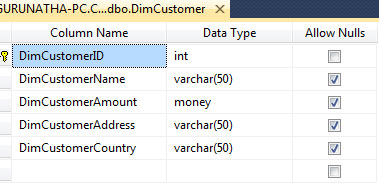
Open up your SQL Server Management Studio. Create a new table why since we want to match existing data coming from external source. So create data table and add some data to it below we have created a simple customer.
Now we will some data to it.
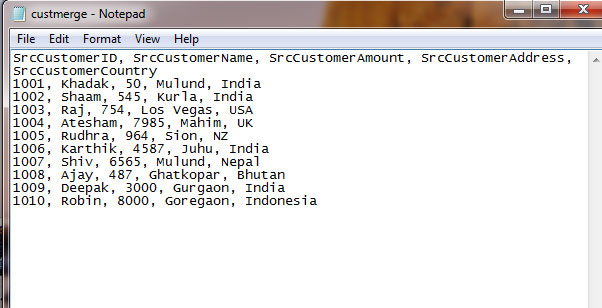
Step 3
We will create a simple TXT file for customer with same fields with data as a source file as shown in bewlo image.
Step 4
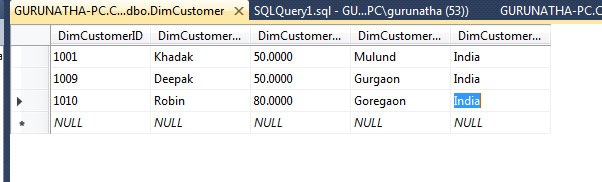
Now we will see the differences between source data and stored data. Means data which will be inserted and updated. Image representation shown below.
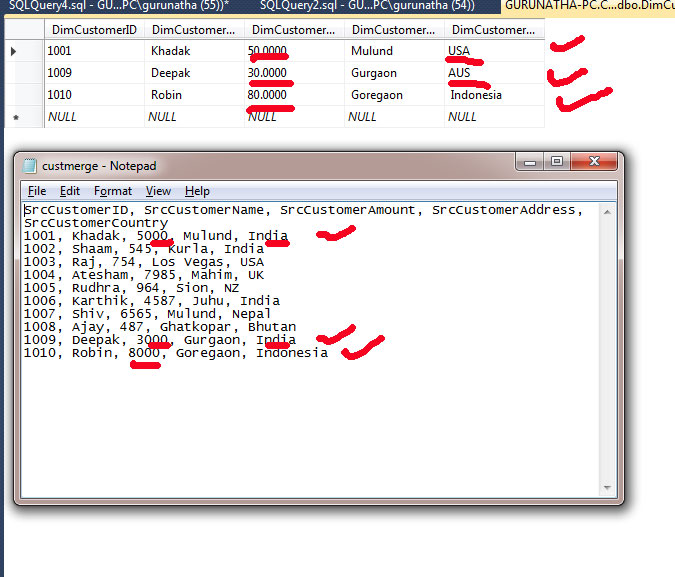
As marked red above, Customer ID : 1001, 1009 & 1010 records will be updated i.e. amount part and customer country and rest records will be inserted as new record.
Step 5
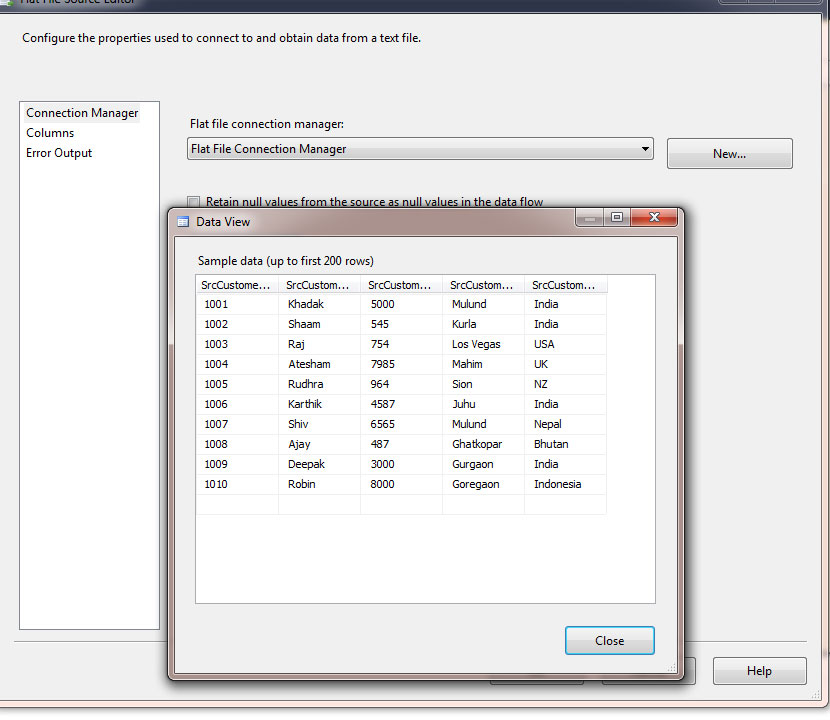
All set now we will go to our data flow tab and drag and drop Flat File Source and configure our txt file as shown in below image.
Step 6
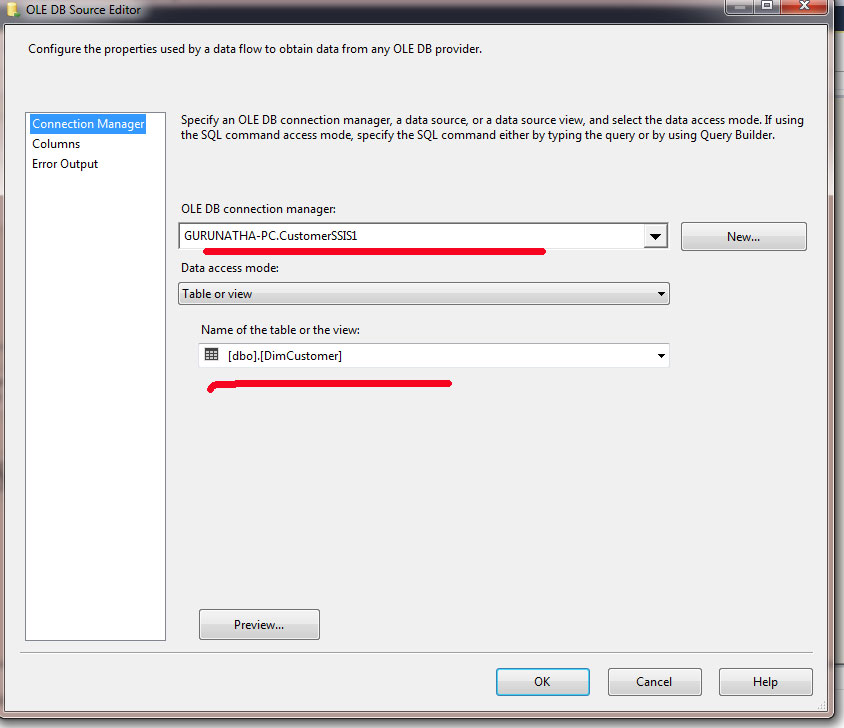
After configuring Flat source file now drag and drop OLEDB source and configure with data table we have created in SQL Management Studio "DIMCustomer" table same as shown in below.
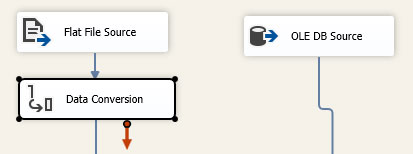
Step 7
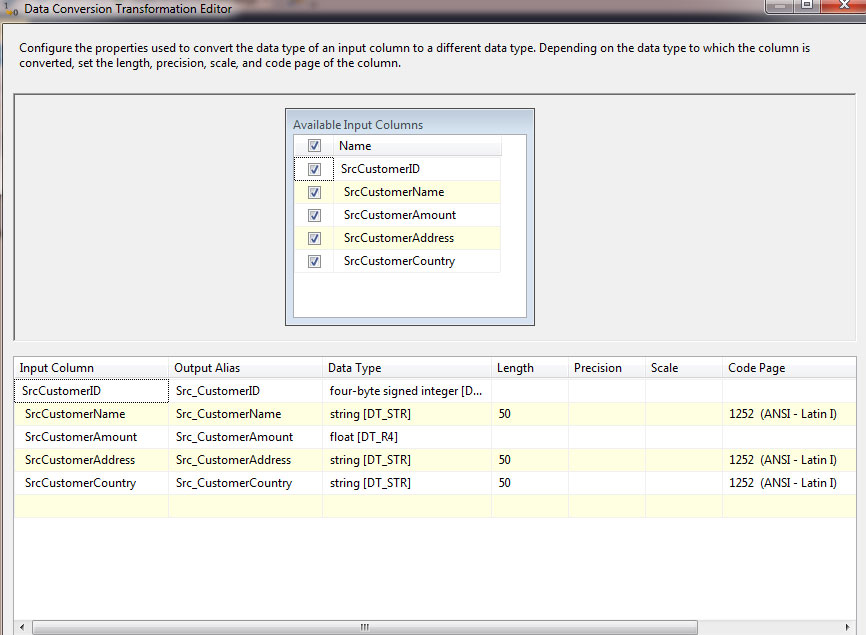
Since we have incoming data in a flat file source we need to converted data as per their respective data types so to do that just drag drop Data Conversion SSIS component and attach to Flat file source and configure it as shown in below images.
Step 8
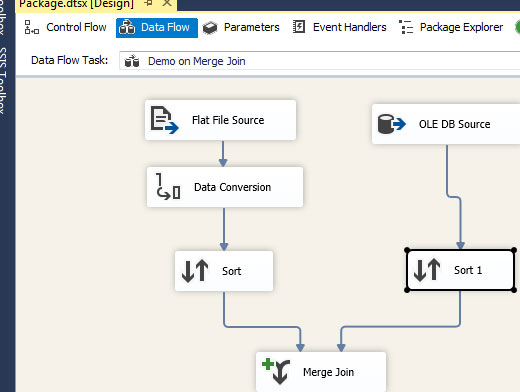
In this step we will sort both dataset why because merge join component needs data to be sorted either in an ascending order or descending order so here we will sort the data in an ascending order with sort component available in SSIS.
So drag and drop two sort component and attach one to Data Conversion and another one to OLEDB source and depending on their Customer ID sort it to ascending order.
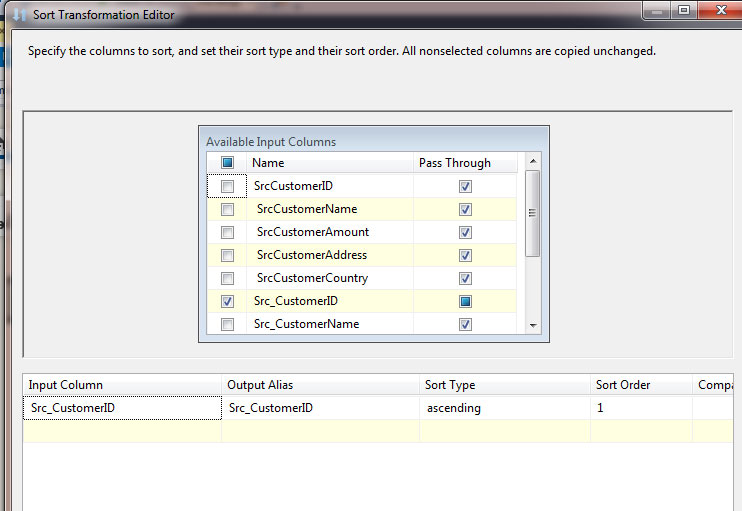
Here we have sorted flat file data by CustomerID asc.
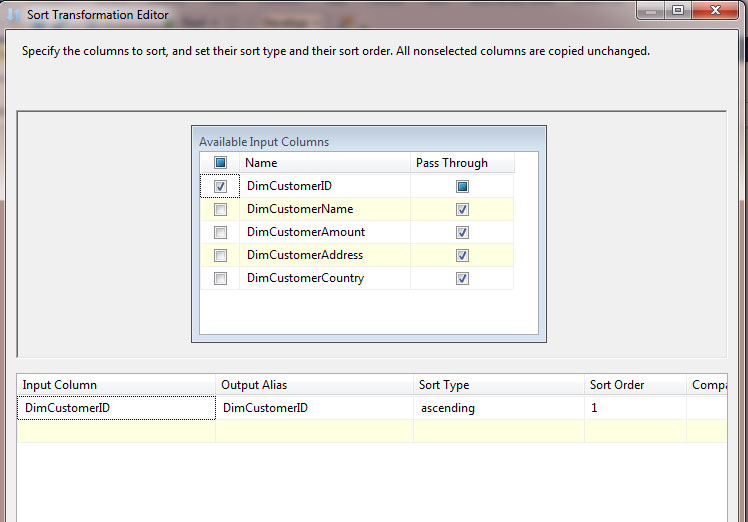
Here we have sorted OLEDB data by CustomerID asc.
Step 9
Here in this step we will drag and drop Meger Join component and attach both sorted datasets as shown in below image.
Left Outer Join : It fetches if data present in the left side table. It preserves the unmatched rows from the left table joining them with a NULL value in shape of right table.
Since our source data is on left side so we will use LEFT OUTER JOIN here and matches existing data from right. So just right click on edit and configure it as shown in below image.

Step 10
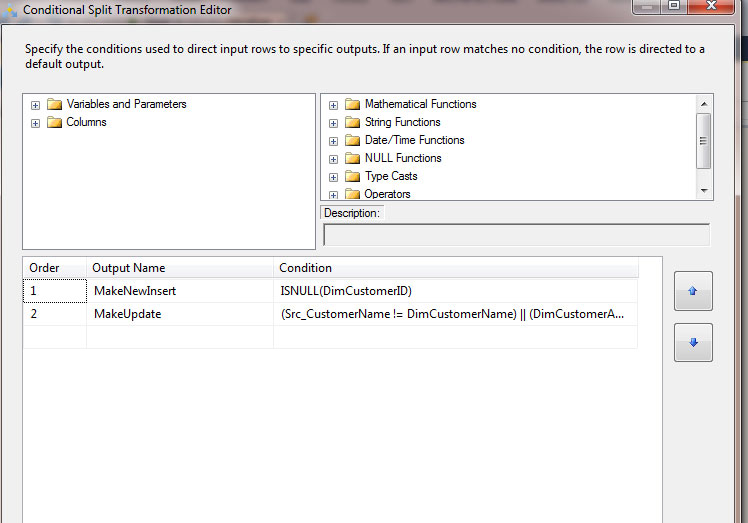
Here we go we almost done now we have merged data now we will split data since we did left outer join if data matches then only both sides data will be there otherwise right side will be replaced with a null so unmatched data which has null value on right side we will considered as NEW data so we will insert that and rest we will match data column wise like if CustomerAmount, CustomerName or CustomerCountry if any one column does not match with left side then we will update it.
(Src_CustomerName notequalTo DimCustomerName) OR (DimCustomerAmount notequalTo Src_CustomerAmount) OR (DimCustomerCountry notequalTo Src_CustomerCountry) then we will update it
So here we have two types of data for insert and update so split data we will use Conditional Split Component
First conditon if right side data is null then INSERT i.e. ISNULL(DimCustomerID).
Second conditon if (Src_CustomerName != DimCustomerName) || (DimCustomerAmount != Src_CustomerAmount) || (DimCustomerCountry != Src_CustomerCountry) any of data does not matches then UPDATE.
Drag and drop component and configure it as per above condition as also shown in below image.
Step 11
Since we have split data into two parts so for the we need two destination.
As per first condition data will be inserted so for this we will use OLEDB Destination component.
As per second condition data will be updated so for this we will use OLEDB Command component to write update command.
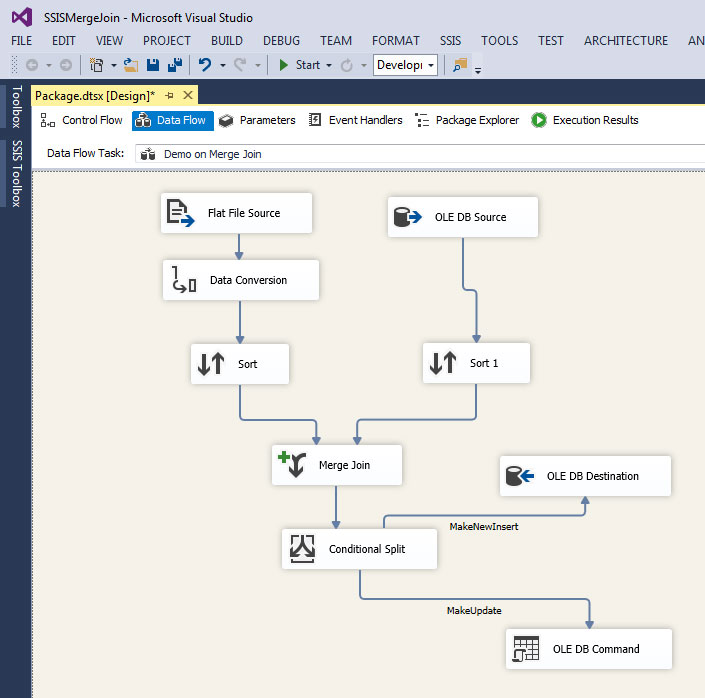
Configure first OLE DB destination same way as we did above.
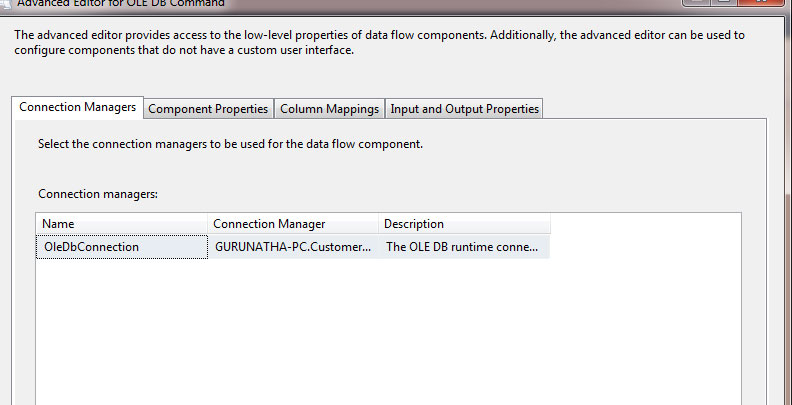
Now to configure OLE DB command -> right click -> edit -> In the connection manager select your SQL connection name as shown in below image.
In the same window -> go to command properties -> select sql command as shown in below image.
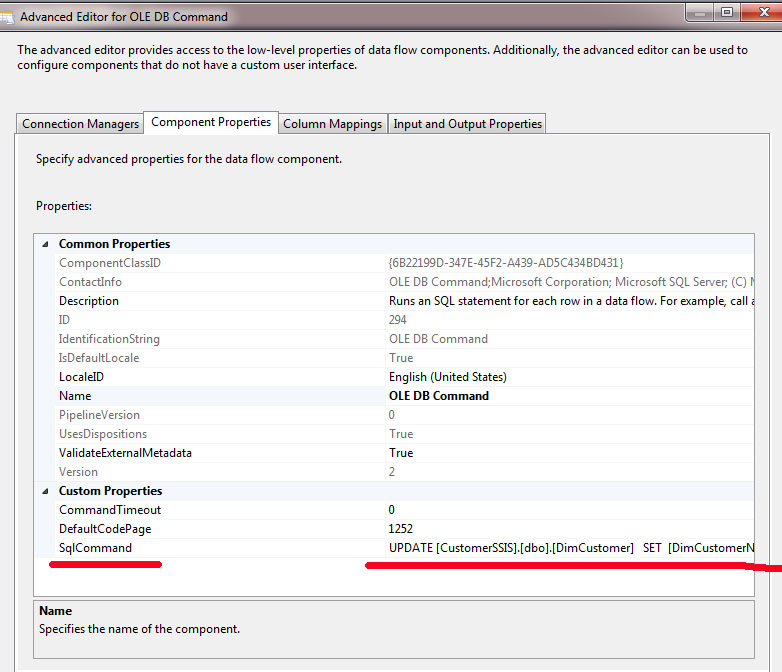
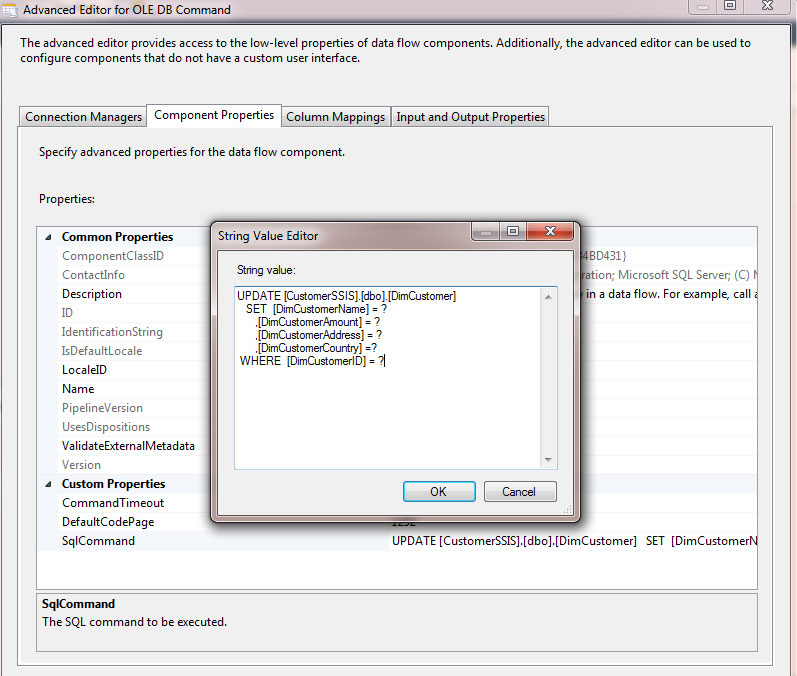
There in above image we wrote simple SQL Update command with "?" "Parameter" values of left side will be replaced here. Remember when you assigning parameters you need to follow same sequence.
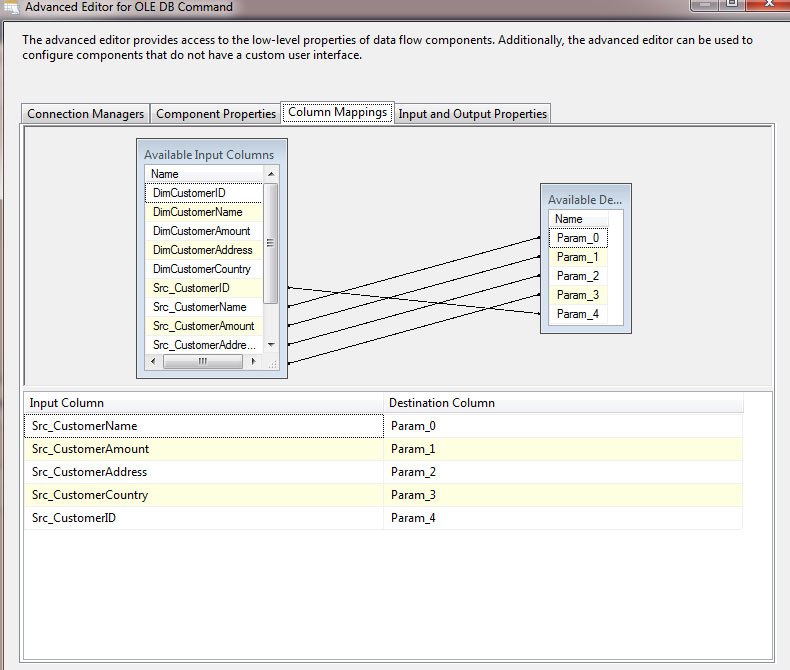
Now again in the same window go to -> Column Mappings and map the columns in a same order as you defined "?" because "?" will be replaced with Params value.
Step 12
All done save the project and build and run (CTRL + F5) .

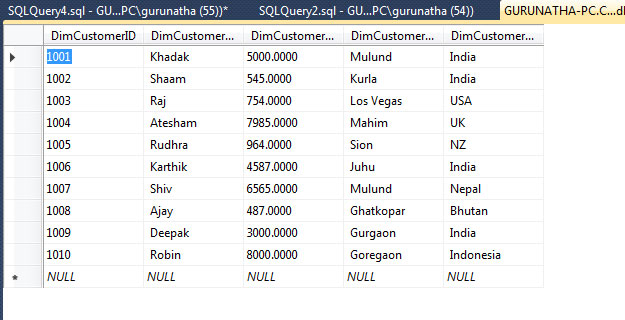
Celebration Time : As you saw above images we have successfully executed the project and loaded and updated data table using merge join. If you liked this article share it with your friends and also on social channels you are connected. Thank you...!
Order only MSBI self-study learning video materials which are available with customized package costing 999 INR/15$. Click this link here to see details and order it.