
Hello Folks, Hope you are doing good, welcome you to our #MSBI tutorial site where you will get all msbi resouces, like videos, self-learning training materials, articles and so on.
Little Introduction : . I'm Gurunatha Dogi a trainer @Questpond, #Questpond is an e-learning firm since 2004 founded by Mr. ShivPrasad Koirala and his team. This site is authorized or run by Questpond. Our vision is simple just to spread technical knowledge. We take offline and Online tranings, we also provide self-learning materials like Source code, step by step learning Videos (Recorded by ShivPrasad and his team). We also sell technical books written by ShivPrasad. For more information log on to questpond website or feel free to contact us in below mentioned details.
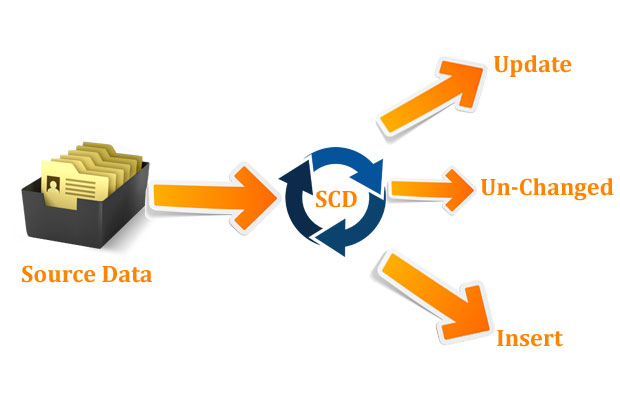
In todays article we will learn SCD - Slowly Changing Dimension with an example in SSIS.
Before we straight away go and understand SCD let's first understand word "Dimension" or "Dimension Table".
Dimension Table is a simple master table (master table can be country master, city master, currency master, language master, product master and so on). So when we say Dimension Table then is it known as Master Table. Or it can also defined as a Table which does not frequently updated are known as Dimension Table. "Dimension Table" a word widely used in OLAP (Online Analytical Programming) techniques i.e in Star Schema or in Snowflakes but for understanding it is nothing a simple master table which does not changes frequently.
So hey folks hope you understood. Now let's understand SCD
SCD or Slowly Changing Dimension it is one of the component of SSIS toolbox. This component is used if you want insert or update data records in dimension tables. Simplest explanation can be it compares incoming source data with existing destination dimension table data using a Business Key (Unique Key). If no record matches then it will treat as New Record or If record matches then it compares attributes for changed attributes if data looks updated then it updates record or if not then it leaves as it is unchanged.
Slowly Changing Dimension checks attributes for three scenarios New, Changed or UnChanged records as we just discussed above.
It means we have to use this component only on those tables which are not frequently updated. This was reason why i have explained you about Dimension Table at start of this article. As name says we have to use this component only to Dimension Table which are not updated frequently.
Note : Do not apply this component on to the table which changes frequently because this component get slow on frequently changes table. As name says we need to apply this component only on those dimension tables which changes slowly.
Let's do this with an example step by step.
Here in this example we will take an example of currency i.e. we will try to update and load currency data as we know that once in a week or month this data changes so in a way it dimension table (Or master table for currency). Since its data changes slowly we can apply slowly changing component to it
So let's do this example step by step
Step 1
Create a new SSIS Integration Service Project -> On control flow tab drag and drop Data Flow Task. All these steps are very similar what we in our third article.
Step 2
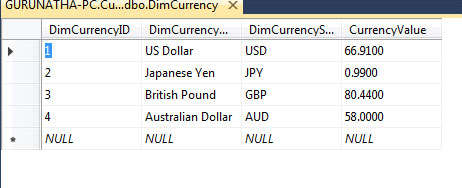
Open up SQL Server Management Studio and create a new table and some data to it why because we want to update existing matching data with source data as shown in below image.
Step 3
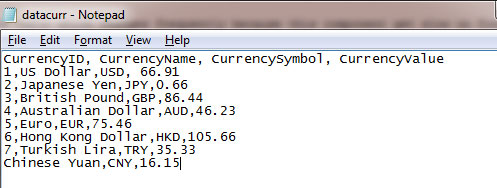
We will create a simple TXT file as a source with currency data with same fields as shown in below image.
Step 4
In this step we will match our both source and Dim Table data just to know which data will be updated, inserted and unchanged as shown below image.
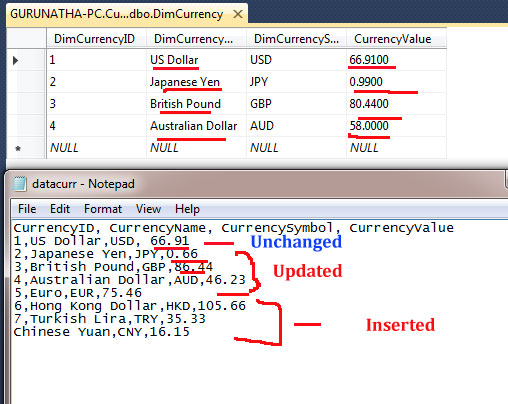
As you see we have one row i.e. Business Key 1 which will be unchanged and Business Key 2,3,4 will be updated as currency values and finally rest remaining business keys will be inserted.
Step 5
So folks now you all know which data will be unchanged, inserted and updated now the same let's implement in practical way.
Go to our data flow tab and drag and drop Flat File Source and configure our txt file as shown in below image.

Step 6
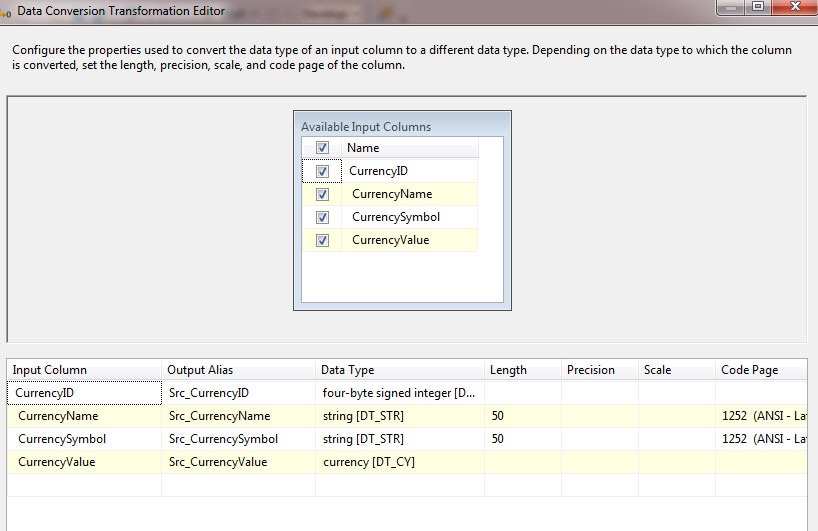
Since data coming from TXT source we will need to conversion why because our destination data warehouse columns have data-types like money, INT so to apply same data-type we will use SSIS data conversion component.
After configuring Flat source file now drag and drop data conversion component and configure it with their respective data-types as shown in below image.
Step 7
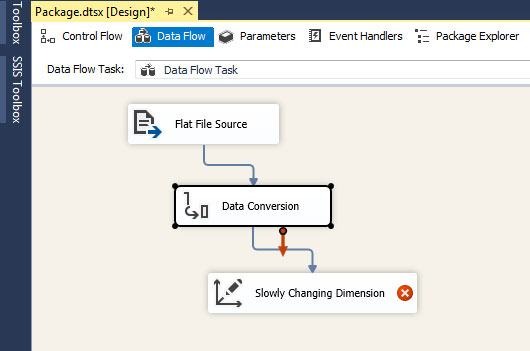
Now its time to drag and drop SCD component from SSIS toolbox so just drag and drop SCD and attach it with data conversion component as shown in below image.
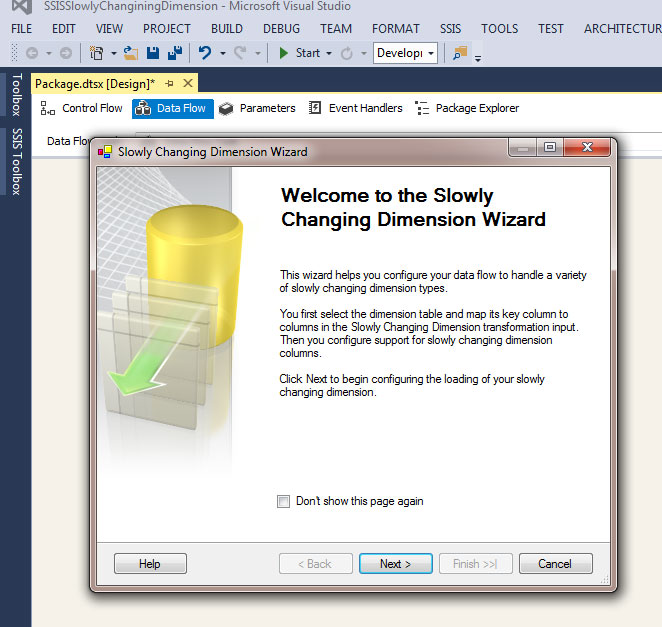
Now right click and do edit on SCD and configure the moment you right click a wizard will prompt so we need to follow that steps.
Do next to go to next step. Now click on New Button to create new connect manager. The moment you click on new button it show you your SQL Server Server name as shown in below image.
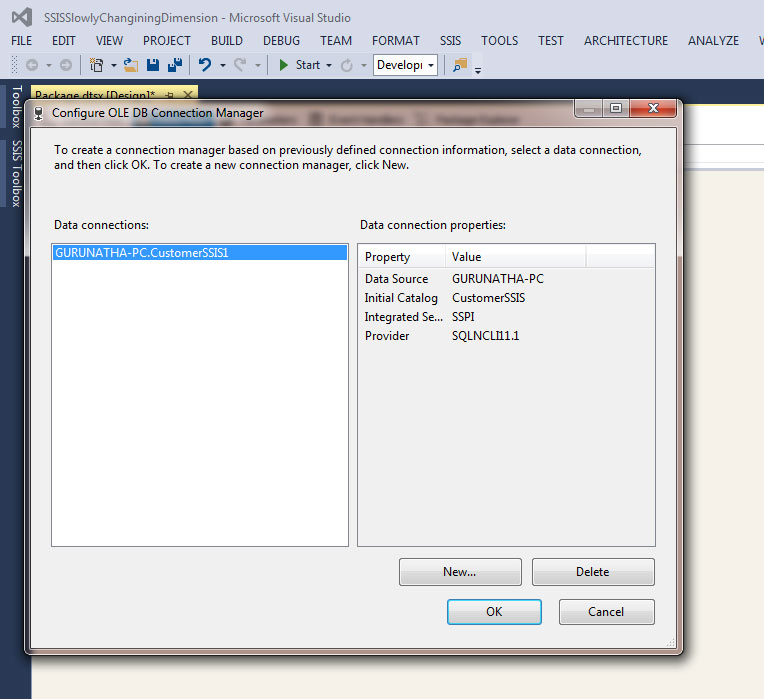
Click on OK button and now below there is a drop down on Table view just select DimCurrency Table.
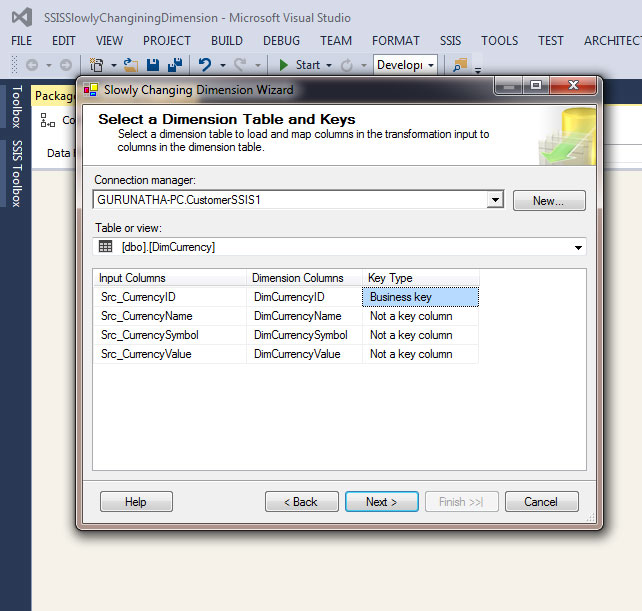
The moment you select DimCurrency Table below it will display column names this DimCurrency Table wherein you need to match these columns with Incoming Source columns (Flat File Source Columns) i.e in Input columns and in the key type for one column in our case CurrencyID need to choose key-type as business key.
For reference please check below image.
Finally if all done then click on Next button.
Step 8
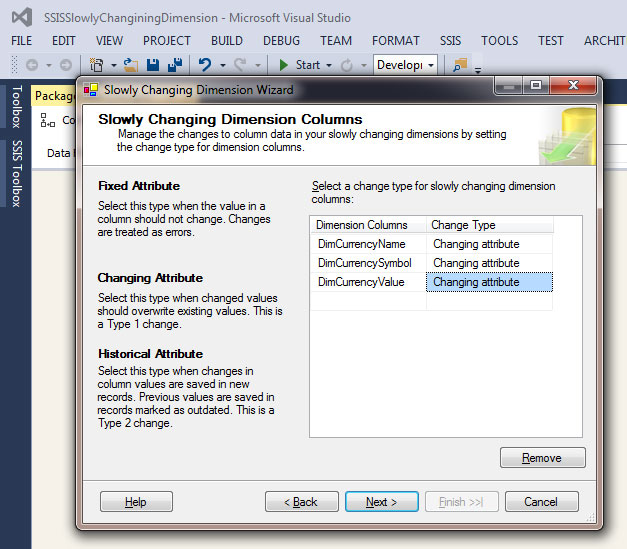
Here in this step you need to select any one attribute if you think that any particular column will be fixed (It will not update any time) then choose Fixed attribute for that column OR if any column data will change periodically then choose either Changing Attribute or Historical Attribute if you want to maintain history of previous changed records then only choose Historical Attribute but most of the cases choose Changing Attribute (No history is maintained).
With the use of Changing Attribute we can update any column data any time. So select that an move to next step.
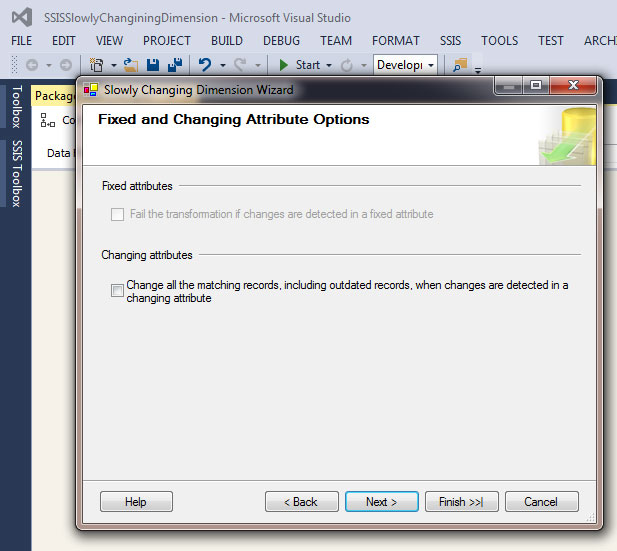
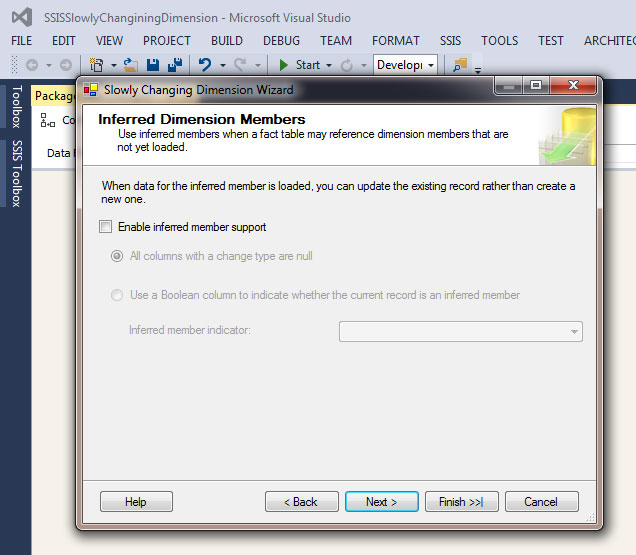
In next step do not any thing just click on next button.
In next step just un-check (Enable inferred member support) click on next button and finish it.
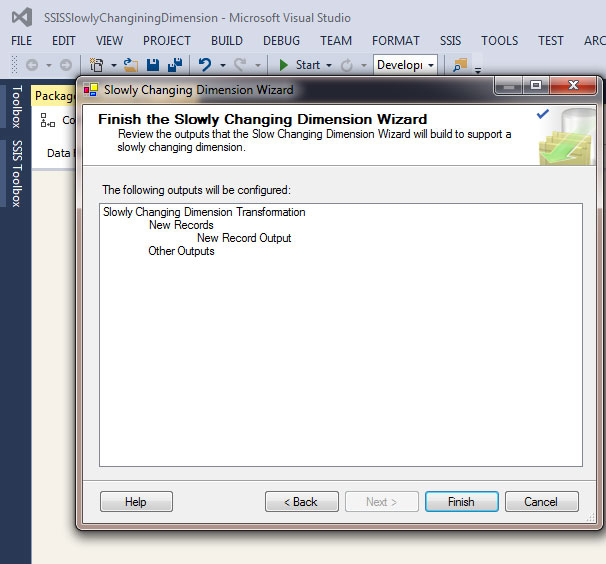
Step 9
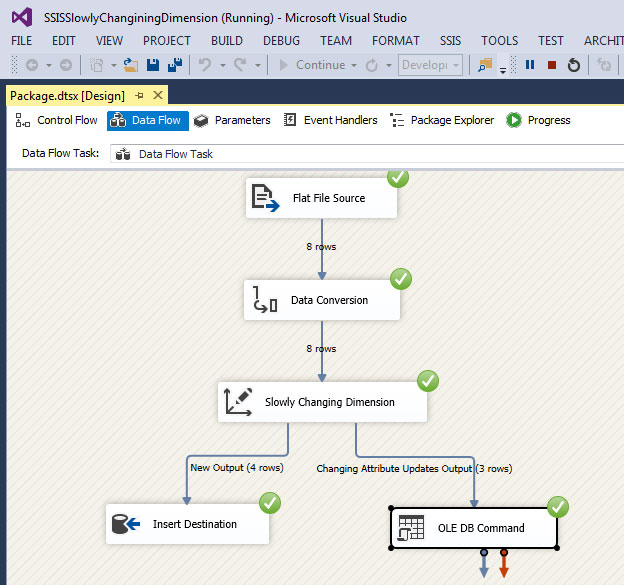
The moment you click on finish button wizard will automatically updates our data flow tab with two new component i.e OLEDB Insert destination and OLEDB command. if you want to know more about OLEDB command then refer our previous article.
OLEDB Insert destination : To insert new records.
.OLEDB command : To update existing records.
If you these both components where configured automatically you don't need to do it. Thanks to SCD wizard.
If you want to know steps to configure OLEDS command then refer our previous article on insert and Update Data Table using Merge Join in SSIS
Step 10
Finally we all done now its time to run this project.
So hey guys if you see we have updated records and inserted new records successfully.
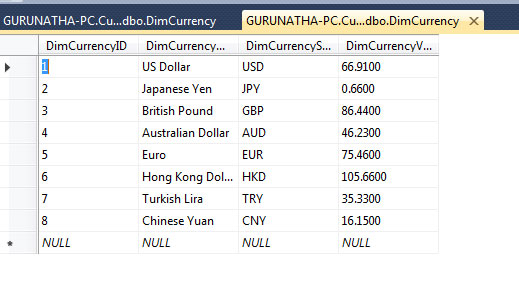
As you saw above images we have successfully executed the project. I hope you have understood this article if you have doubts feel free to contact us. Thank you...!
Order only MSBI self-study learning video materials which are available with customized package costing 999 INR/15$. Click this link here to see details and order it.