
Hello Friends, #MSBI Learners, welcome to step by step msbi tutorial. I'm your host Gurunatha.D a simple enthusiastic developer hunt to learn new technologies, learning and working is my passion that i do daily.
Little About my Company : #Questpond is an e-learning started by Mr. ShivPrasad Koirala with a vision to spread tech knowledge. I love working with this company simply because it only cares about quality teaching, videos, books, online subscription. #quetpond + ME we love to deliver quality training and till now we succeeded and want to continue more same in coming future session. If you are looking for any .NET training (AngularJS, MVC, ASP.NET, MSBI, Sharepoint and many more) feel free to touch base with us.
Coming back to article in today's session we will learn and understand SSIS lookup using an example step by step.
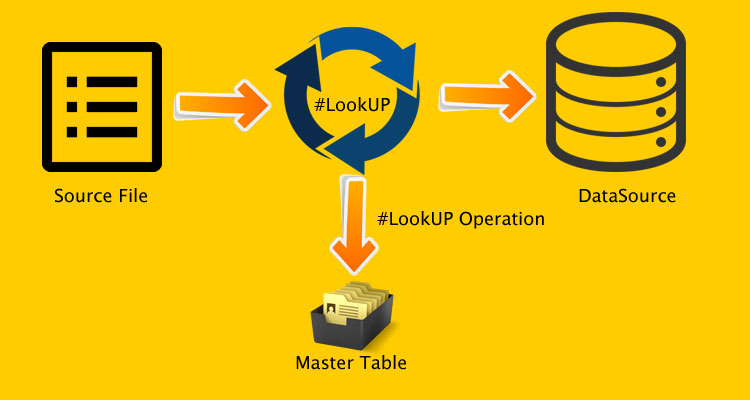
LookUp is very useful transformation SSIS component it performs lookup operation by connecting input value with data-table or table dataset columns. It compares source data with existing table dataset and filters matching ones and un-matching ones.
For example let's say you have customer table with columns CusomerID, CustomerName, CustomerAddress,CustomerCityID where CusomerID is a primary key and CustomerCityID foreign key for City Table. And let's say you have a sample source data in this format : "1001 as CustomerID", "Shaam as CustomerName", "R-no 202 - mulund naka as CustomerAddress" & "Mumbai as CustomerCity". Now if you see in the destination Customer Table we have CustomerCityID which is foreign key [Integer value] and here in the source file we have string type value and for proper insert we need its Foreign key value. So to get this foreign key value we need to use #LookUp component which compares source records with City master table to get matching key values and same can be updated to Customer table.
Hope you have understood about #LookUp component.
Now let's understand same component using real time example that we will do step by step.
Here we will do a simple example to make you understand quickly how LookUp works. So we will take up a Customer Table with columns : CustomerID, CustomerName, CustomerAmount, CustomerAddress, CustomerCountryID, CustomerISActive. We will also create master table for Country List name it as Country with columns : CountryId, CountryName. We will add up some country names to this master table.
When we load data from source file which contains "Customer Records with country name" before it reaches to destination table (Customer Table) in between we will apply LookUp component to compare source records with existing Country Table and filters matching ones and un-matching ones. On matching key values we will replace with country name and same we will update it to destination table.
So let's do this complete example step by step
Step 1
In this step we will go to our SQL management studio and create country master table with columns (CountryID, CountryName) respectively.After that we will some country names to this table.
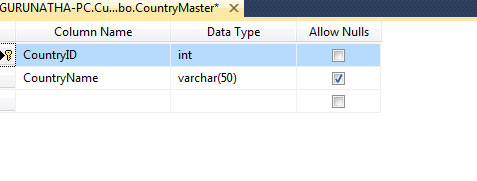
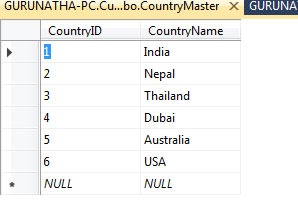
As you saw in above images we have successfully created country master table and added some country names to it.
Step 2
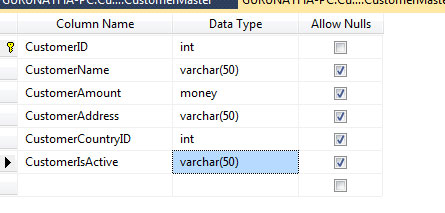
Here in this step we will create CustomerMaster table with columns : CustomerID, CustomerName, CustomerAmount, CustomerAddress, CustomerCountryID, CustomerISActive respectively in SQL management studio as shown in below image.
Step 3
Let's create our source file here for this example we will use flat file source and add up some dummy data as shown in below image.

Step 4
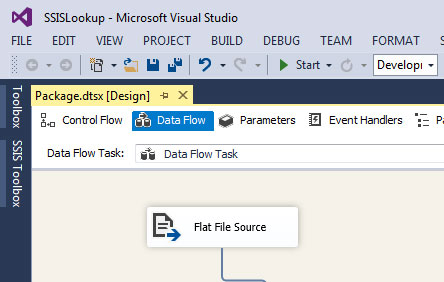
Open up MSBI studio and create SSIS project. Once done just drag and drop Data Flow task from toolbox and double click on it. If you are new to MSBI request you to read all our previous article click to navigate.
Step 5
Since our source file is Flat File so we will use Flat File Source component if you want you can use different modes like Excel and so on.
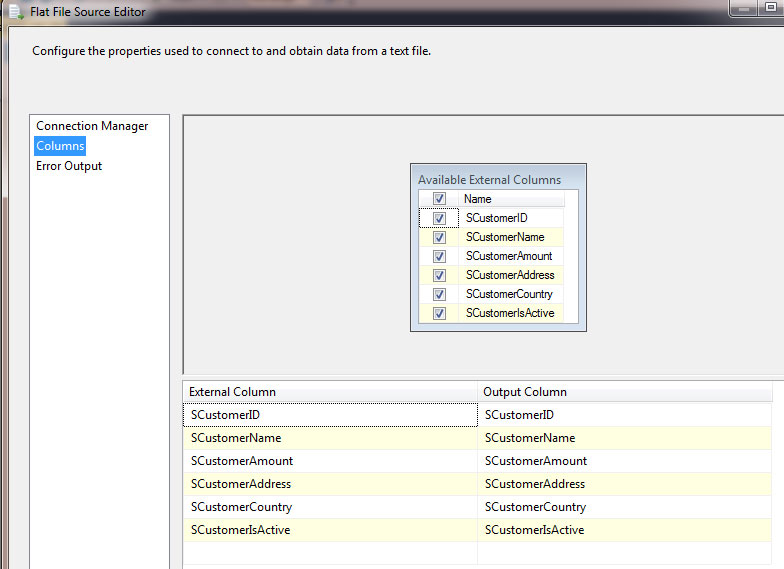
For now just drag and drop Flat File Source Component from SSIS toolbox and configure it. To know about configuration step by step read this article - Data Conversion.
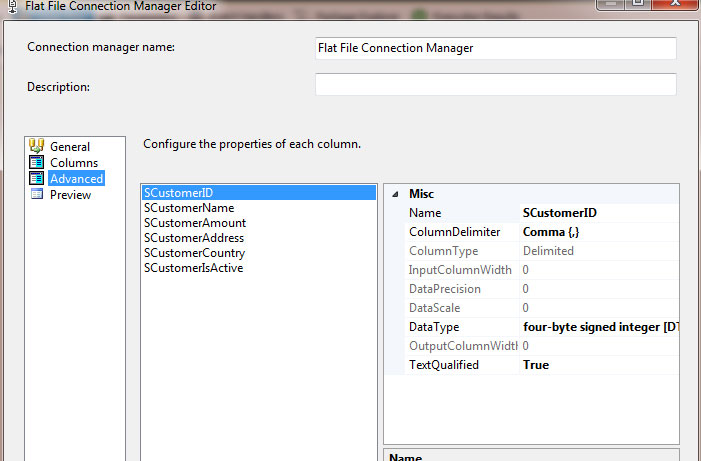
Since we are loading from a source file to make sure you have assigned proper data-type to it. To configure it go to Connection Manager -> double on flat file connection -> Advance and assign appropriate data-type as shown in below image.
Step 6
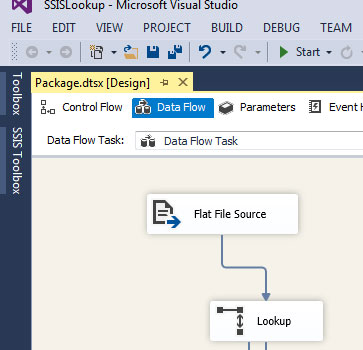
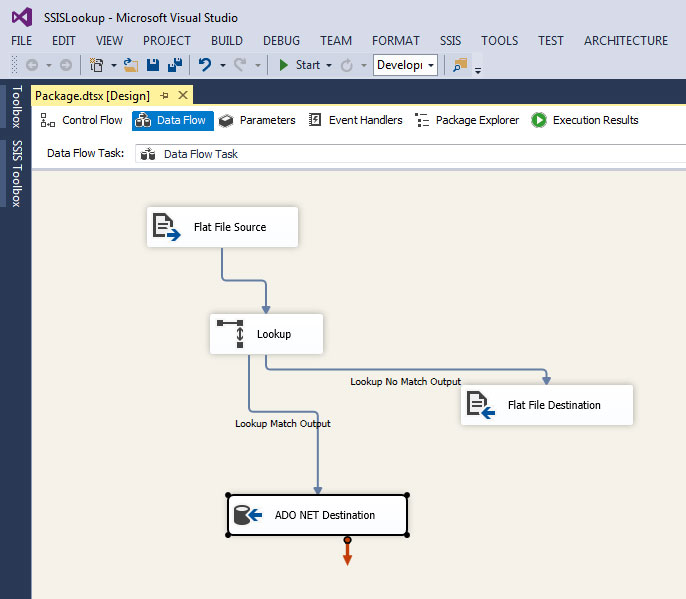
The most important step here we will drag and drop SSIS #LookUP component and attach it with Flat File Source component as shown in below image.
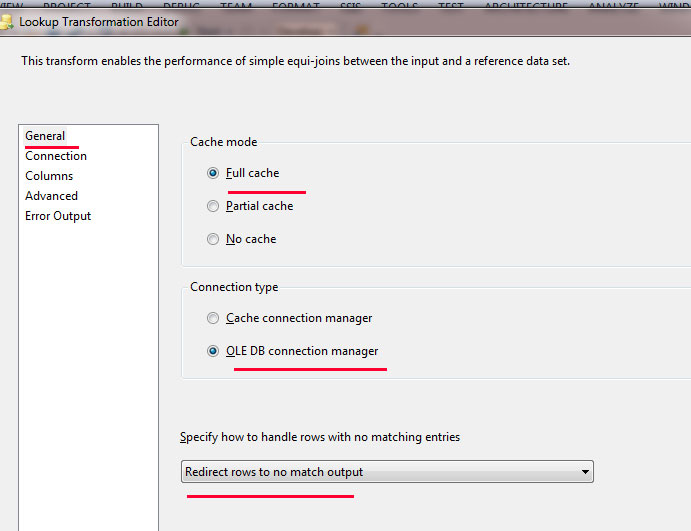
Select #LookUp and right click and configure. Once you right click and edit a modal box will pop up where you will see some menus on left hand side. Select General menu -> Specify how to handle rows that no matching.
This means in-case if rows are not matched due to some reason then what to do. Here we will say redirect rows to no match output means if rows are not matched for some reason then throw it via no match output. As we discussed earlier that #LookUp has got two outputs Matched and No Matched Output so we will throw unmatched rows via No Matched output. So in the drop drown choose "Redirect rows to no match output. This will also help us to identify erros occur during runtime.
Keep cache mode to Full Cache and Connection mode to OLEDB connection. Image representation is given below.
Now from left-hand side menu select Connection to configure with our CountryMaster table. As we discussed earlier since we are doing this because we want CountryID to insert in CustomerMaster Table and in a source file we have countrynames. So we will compare CountryNames of source file with CountryMaster table using #LookUp and we will output only CountryID from that and same we will load it to our destination CustomerMaster Table.
Select Connection menu -> Choose you SQL connection name -> Select CountryTable as shown in below image.

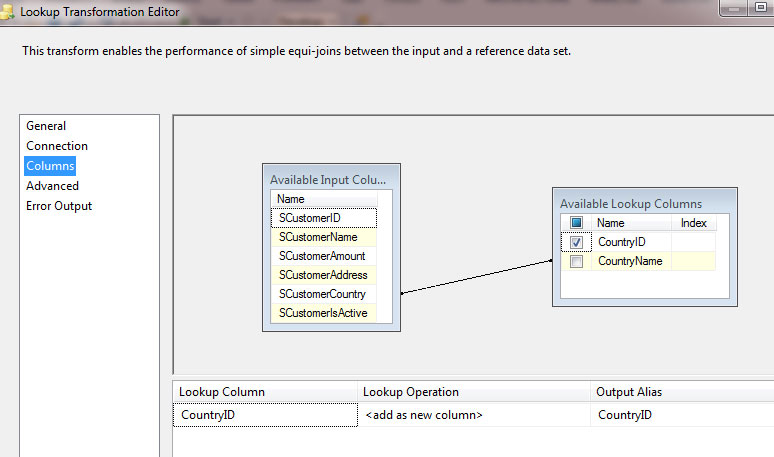
Again from left hand side menu choose columns in that you will find Source column names and countrymaster table columns (right-side). Since we are comparing country name so just drag and drop arrow to countryname from both side (SCustomerCountry -> CountryName) and select output as CountryID as shown in below image.
All done now simply click on OK button and save it.
Step 7
Since we have two outputs so for that we will use two destinations.
1 : For Matched Output -> ADO.NET Destination.
2 : For NO Matched Output -> Flat File Destination.
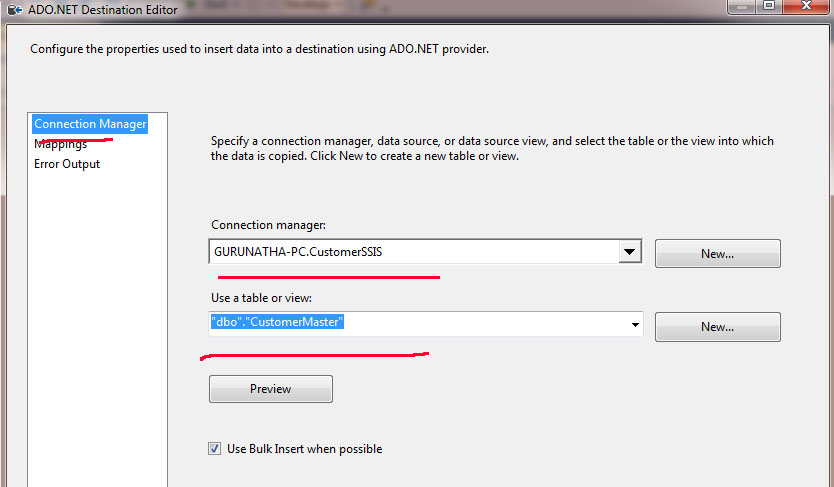
Drag and drop ADO.NET destination right click and configure it. Here we will choose our data-table as CustomerMaster since we are loading all data to this table.
Drag and drop Flat File destination right click and configure it. Here we will choose any .txt file to save error output.
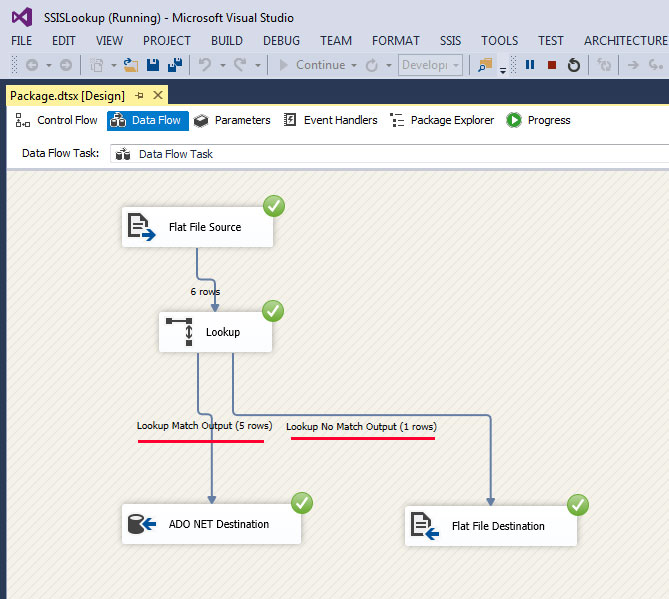
Step 8
Congratulations finally we have reached our final step, Click on start run this project.Here in this project on source file of last record I have given a space in countryname just to land up this row to my No Match error output.
Note : SSIS LookUp is case-sensitive to make sure before using this component make sure your source file and destination record to be in proper matching case for best keep it to lower case then after loading make it to proper case.
So let's run this project here 5 records will be inserted and 1 record will insert in .txt file ( Flat File Destination ).
Hope you have understood this article on #LookUp if you have any doubts feel free to touch base with us on below mentioned contact details.
Order only MSBI self-study learning video materials which are available with customized package costing 999 INR/15$. Click this link here to see details and order it.