
Hey Friend, welcoming to our #MSBI tutorial site. I'm your host Gurunatha.Dogi an enthusiastic programmer loves to read, write, hunt, play with coding in a day-to-day lifestyle. Loves learning new tech or new software development at a same time loves to train individuals who seeking to get into .NET, PHP, MSBI, Sharepoint, SQL Server, Object Oriented Programming, C#, HTML5 and Bootstrap responsive.
About#Questpond : I'm a trainer at Questpond and loves to work with ShivPrasad Koirala and Team. We energitic team and enjoys doing training. Here you can seek for self-learning materials, books, videos, one-to-one training and corporate training. If you want to learn any IT technology language feel free to touch base with us.
Here in this article we will learn SSIS tool i.e. Merge and Merge Join step by step with an example.
SSIS merge is one of the component of SSIS, available in toolbox. SSIS merge works similar way to a SQL join it merges the two or more different sources (Sources can be of same type or different type / heterogeneous) into a single output. SSIS is all about collecting data from different sources, If you want to merge the collected data from different sources then we can use merge component. Merge component accepts only 2 sorted (compulsory) inputs. if there is more than 2 inputs then it best to use Union All transformation component. Also Merge transformation have only 1 output and does not have any Error output.
Note : Source can be anything ADO.NET Source / Excel Source or any Flat File Source.
SSIS merge join also combines data from different sources (Source of same type or different type (heterogeneous)) into single output or merged output. It uses merge concept based on (Inner, Left and full). We can use Merge Join based on specific condition like combining data on matching keys with that Inner, Left and full. Merge Join component accepts only 2 sorted (compulsory) inputs and one output and one error output.
Unlike Merge, Merge Join combines data depending on matching keys or string name.
On the same let's see an example of Merge and Merge Join one by one in step by step way.
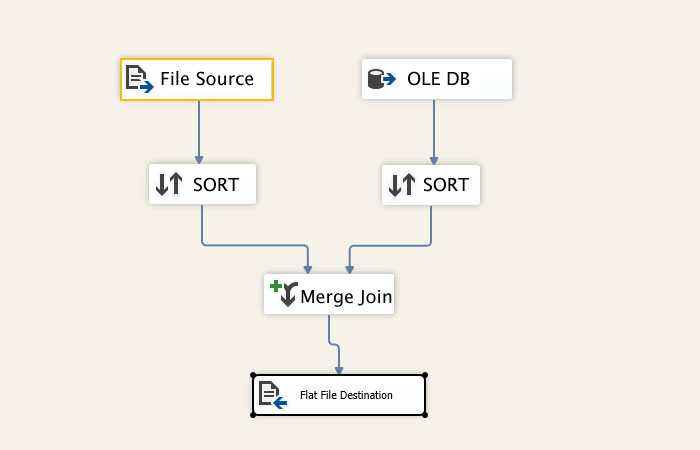
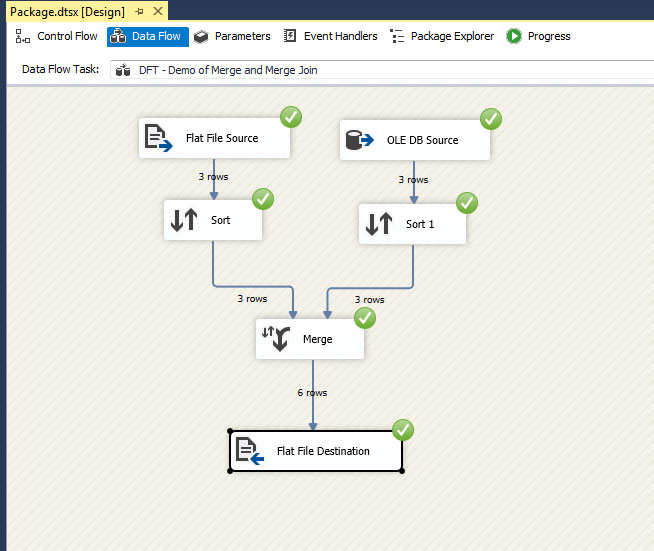
Here in this we will take two data sources 1 Flat File 2 : OLE DB Source and we will load data then we will sort data why because SSIS merge transoformation accepts sorted data then we merge both sources sorted dara and display output in a flat file destination. An example is simple and quick to understand if you are new to MSBI kindly ready our previous articles.
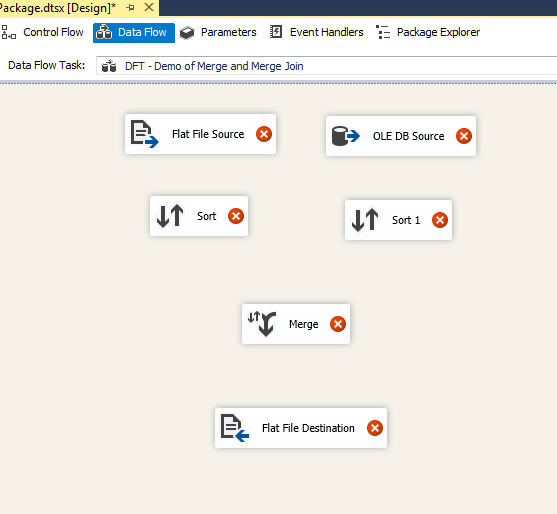
Step 1
As shown in above image just drag and drop all above shown components.
Step 2
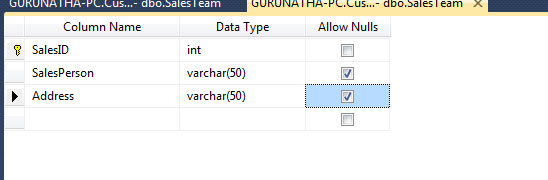
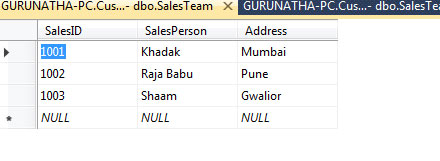
Go to SQL Management Studio and create a simple table like we did here by creating Sales Table with SalesID, SalesPerson and Address (int, varchar, varchar) data type respectively.
Add some data
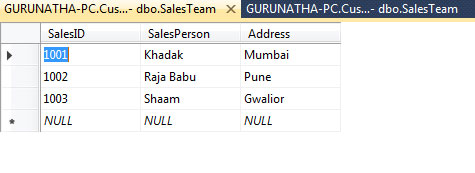
If you see here we have three records of keys 1001, 1002 and 1003.
Step 3
Now let's create txt file for Flat File source and add some data to it as shown in below image.
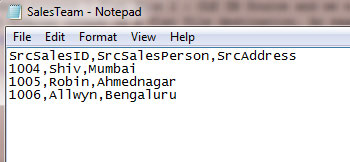
If you see in above image we have added more three records i.e. 1004, 1005, and 1006. Now we will join both data source records into single output using Merge.
Step 4
Here in this step we will configure both source files one by one.
So let's configure our Flat File Source file. In order to do that just right click on Flat File Source and configure it all these steps we have repeated many times in our previous articles if you still don't no then no problem just go to article section and read article. Hope that will help a lot to undetstand it.
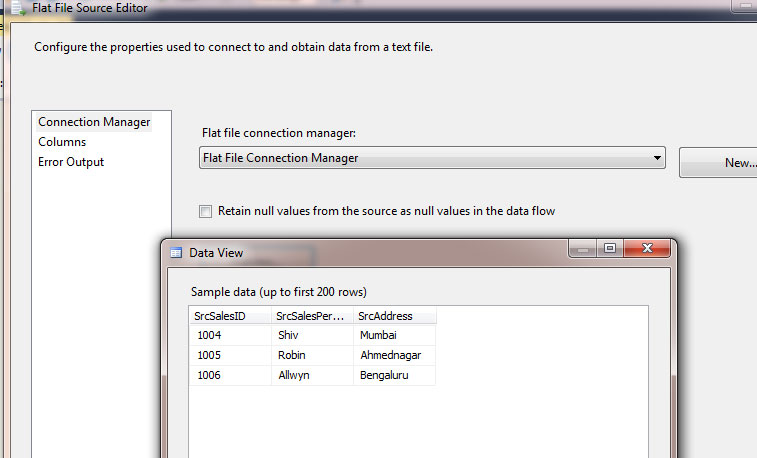
As you see we have configured our first source properly.
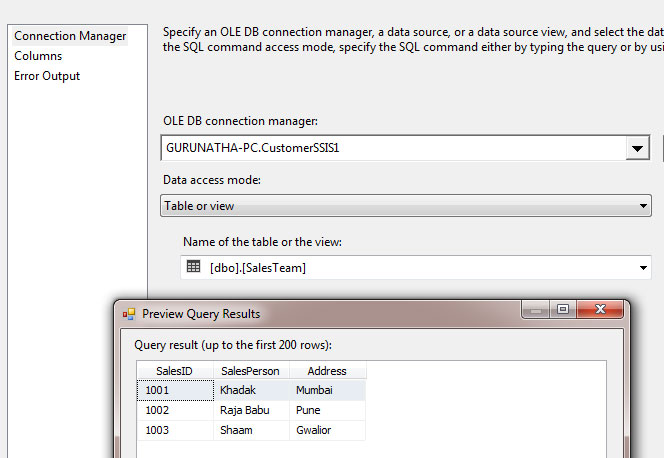
Now let's configure our OLE DB source inorder to do that select OLE DB source and right click -> edit and configure it.
Step 5
Now that we have successfully configured our both sources now its time to sort then either in ascending order or descending order. So input, output of both source files to Sort component.
Once done its time to configure the Sort components one by one, So right click and configure it.
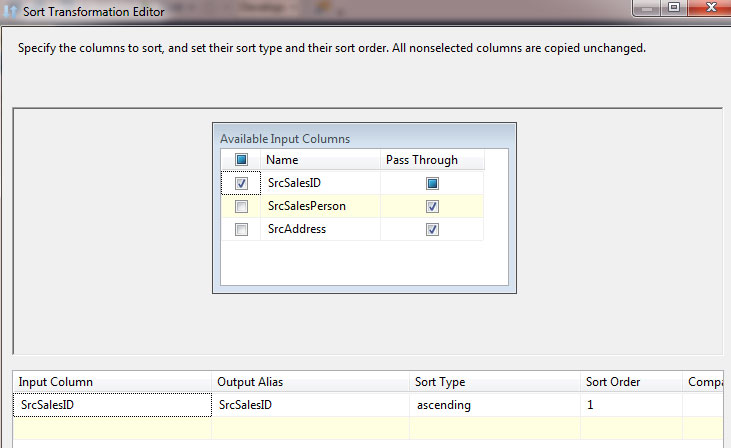
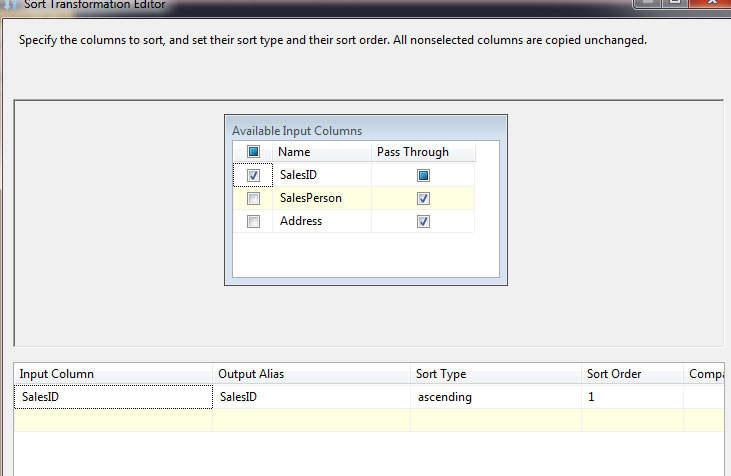
If you see in our above images we have successfully sorted both components in an ascending order.
Step 6
So now we have two sorted outputs let's input them to Merge Transformation component. Now just right click on it and configure it as shown in below image.
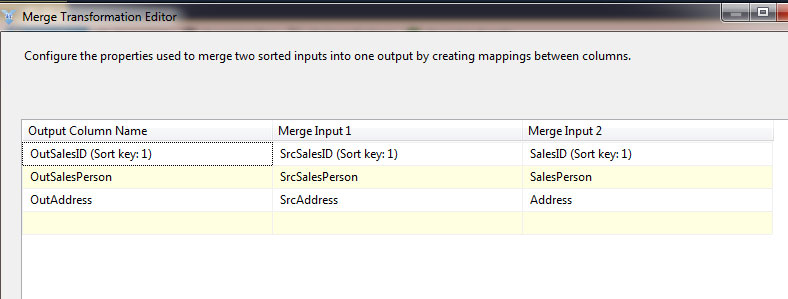
For identification we have made output columns as OutSalesID, OutSalesPerson and OutAddress respectively.
Step 7
Great we are in our final step. Now we have to configure Flat File Destination so we have one output from merge component let's input to flat file destination and configure it.
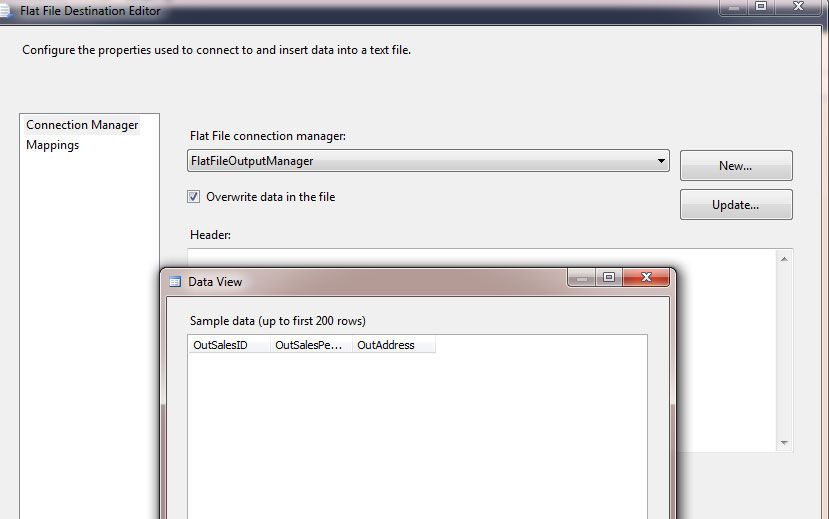
All set to run this project, Let's run this project and see the output.

As you see from above output both of the data sources are merged into single file output and that we achieved using Merge Transformation Component.
We will take up same example but will do some modification in flat file source file i.e. we will remove Address and replace Salary and we will try to merge both sources i.e OLE DB and Flat File using merge join using matching keys i.e. SalesID.
Step 1
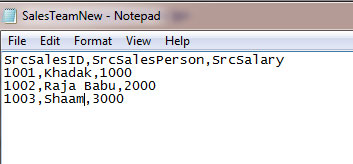
Let's create a new txt source file for Sales with columns like SrcSalesID,SrcSalesPerson,SrcSalary as shown in below image.
If you see closely here we have made some changes instead of Address we replaced it to Salary why we did it because to implement merge join by combining data by their SalesID and displaying complete output including SalesID, SalesPerson, Address and Salary.
So friends let's compare both source files.
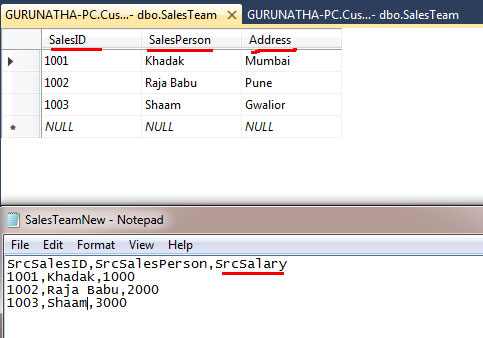
IF you see above image both source files (Flat File Source & OLE DB Source) where SslesID and SalesPerson are common in both sources, From these both source files we need to pick up marked red fields which we want to make it to output final destination by matching their.
Step 2
Configure your respective source files i.e. Flat File Source with new txt file and OLE DB Source same as above used in first example.
So configure only Flat File Source file.
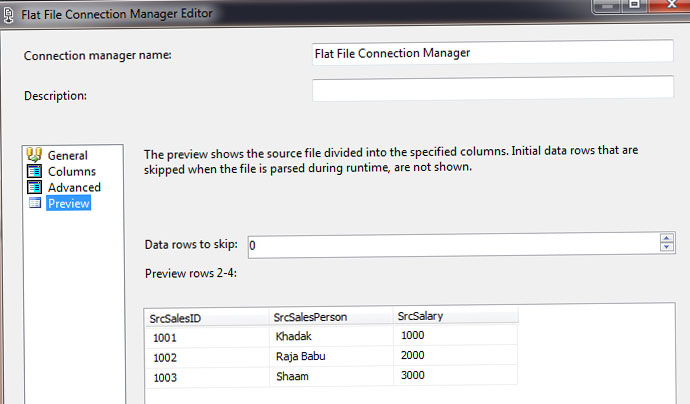
Keep OLE DB Source as it is.
Step 3
Drag and drop sort component and configure as it we did previously for Merge Transformation.
Step 4
Since we have sorted data now let's drag and drop Merge Join Transformation component and configure it. Two output of both sorted component input it to Merge Join and then right click on it and configure it as shown in below image.
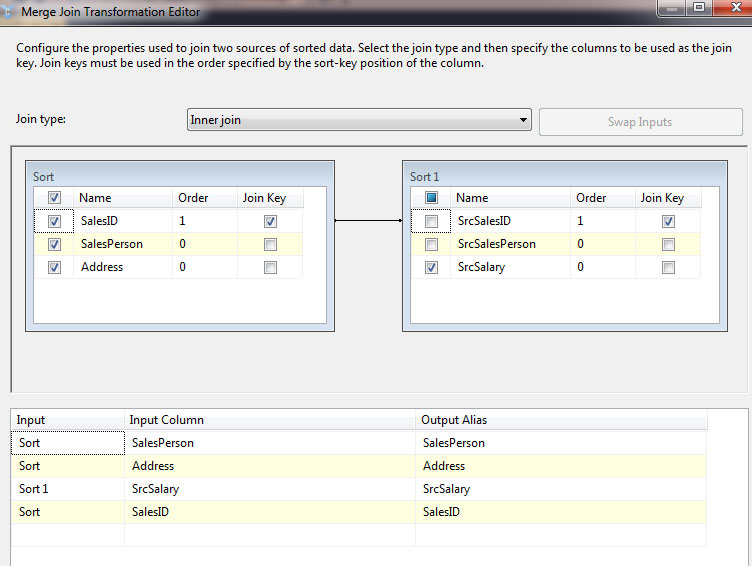
Join Type : Inner, Left Outer Join and Full Outer Join.
If you want to display only matching columns then go with Inner Join. If you want to display complete left table column values irrespective of matching with right table then go with Left Outer Join. If you want to display both table columns then Full Outer Join. Since here i was needed only matching columns so we choose Inner Join and selected only those columns which i want to display it on Destination Flat File.
Step 5
Configure Flat File Destination : We came to final step just drag and drop Flat File Destination component and output of merge join make a input to it and right click and configure it.
Celebration time : All done just run this project and enjoy the output.

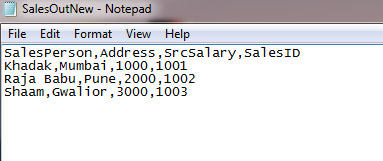
So friends as you saw how we have merged multiple sources into single output. Merge and Merge Join a useful component when we are working with multiple sources to convert them to single output. Hope you like this session we will come up with more topics so stay tuned with us coz we weekly post a new article. Kindly share this article on your social accounts.
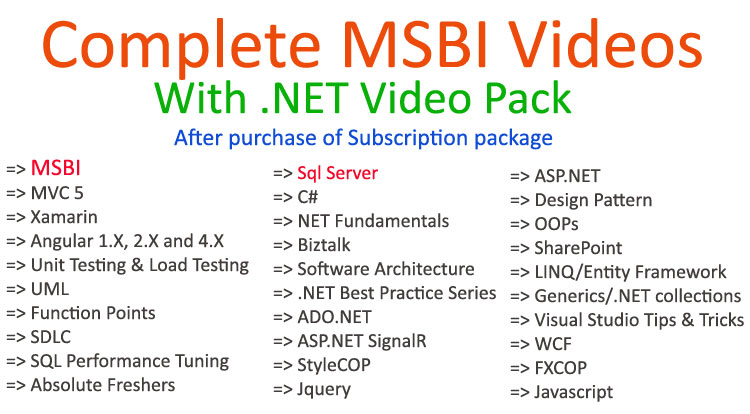
Order only MSBI self-study learning video materials which are available with customized package costing 999 INR/15$. Click this link here to see details and order it.